Using your Contact Filters
Last updated: October 26, 2026
Use Contact filters to find and segment contacts across your full book of business — by activity, when they were added to the map, location, seniority, function, buying role, and more.
Contents
Before you start
Open the filter panel
Available filter options
Take action on your filtered list
Save and reuse views
Need help?
Before you start
Contact filters are available to all users from the Contacts page in the left sidebar.
Use the Contacts page to find contacts for event invites, outreach campaigns, or any targeted list-building across accounts.
Some filters only appear if your workspace syncs with a CRM.
Saved views can be kept private (just for you) or shared with your full team.
Open the filter panel
Click Contacts in the left sidebar.
Click Filter in the top toolbar to open the filter panel.
Choose a filter, then pick the values you want.
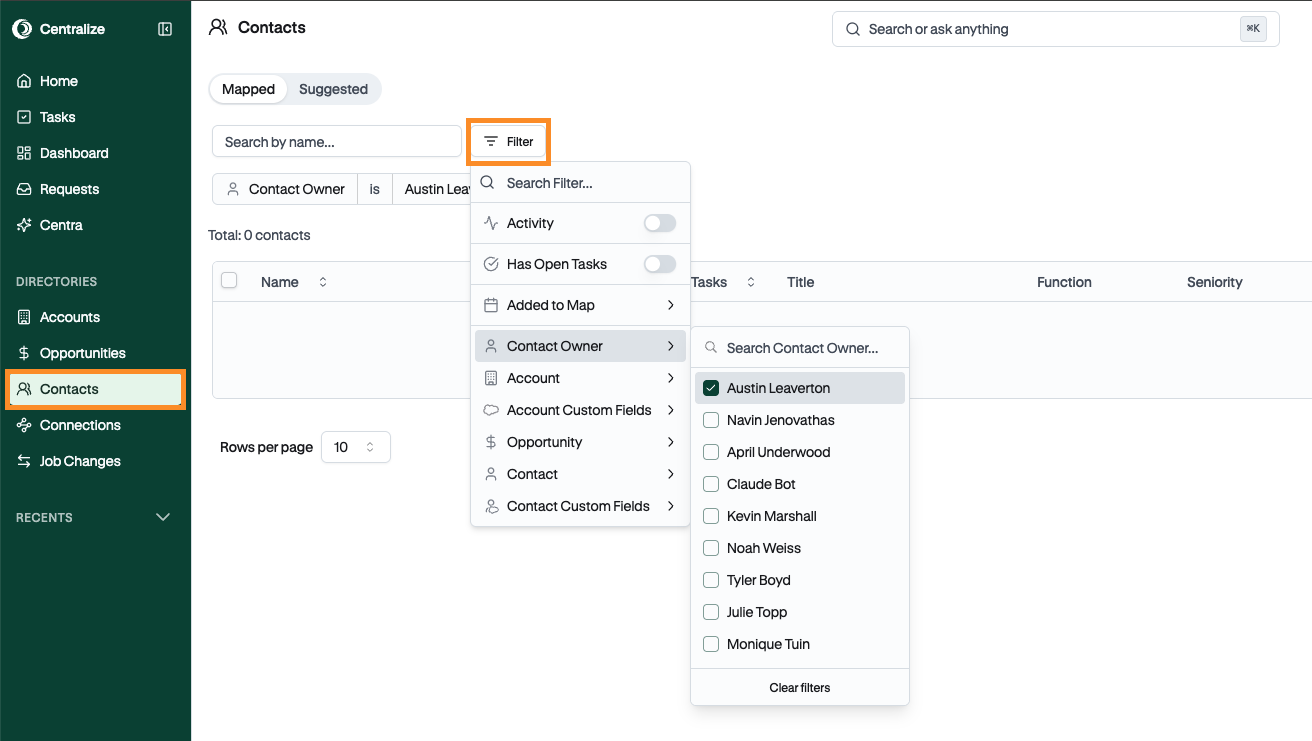
Available filter options
Once the filter panel is open, you can filter contacts by:
Activity — contacts with recent activity. Narrow by Timeframe, Channel, Direction, Engaged By, and Engaged With.
Added to Map — contacts added to their account's map in the Last 7 days, Last 30 days, Last 90 days, or a Custom range.
Account — filter by account Name or Owner.
Account Custom Fields — any account field your team syncs from your CRM.
Opportunity — filter by opportunity Name, Owner, or Close Date. Requires a CRM connection.
Contact — filter by:
Has No Open Opportunities
Has Alumni Strength — contacts who switched companies recently, previously worked at an existing customer, or were previously on an opportunity at an existing customer
Location
Function
Seniority
Buying Role
Tags
Contact Custom Fields — any contact field your team syncs from your CRM.
Tip: Most reps use Contact filters to find people in a specific location who are Director-level or above and in a relevant function for upcoming events or in-person meetings.
Note: The Added to Map date ranges always count back from today. A saved view using Last 30 days keeps showing the most recent 30 days each time you open it.
Take action on your filtered list
Once you've filtered down to the contacts you need, click More actions to:
Export CSV — download the list. If you've selected contacts, this becomes Export Selected.
Export History — find exports you've downloaded before.
Email Contacts — open your email app with every contact in the list in BCC. If there are too many to fit, Centralize offers to copy the addresses instead.
Add contact — add a new contact.
Edit Salesforce fields (or Edit HubSpot fields) — update CRM fields right in the table. See 📄 Edit Salesforce Contact Fields.
To add contacts to a sequence or add tags, select the contacts first. The buttons appear in the toolbar. See 📄 Add Contacts to an Outreach Sequence or Gong Engage Flow.
Save and reuse views
For any contact list you plan to revisit, save it as a view so you don't have to rebuild the filters each time.
Set your desired filter options.
Click Saved Views and give your view a name.
If the view is only for you, leave Make available to everyone deselected. If you want teammates to access it, enable that toggle.
Tip: Check existing saved views before creating a new one — a teammate may have already built what you need.
Need help?
If you're having trouble filtering or saving a view, contact support@usecentralize.com for assistance.