Reporting Hierarchies: See Your Team's Accounts, Deals, and Activity in One View
Last updated: October 16, 2026
Set up reporting hierarchies to give managers a single filter that surfaces every account, opportunity, and touchpoint owned by their team — instead of manually selecting or excluding each rep's accounts one by one. You can assign managers one at a time, update many reps at once, or import your whole team structure from a CSV.
Contents
Why set up reporting hierarchies?
Before you start
Assign a rep's manager
Bulk assign a manager to multiple reps
Import reporting lines from a CSV
View your team's data
Troubleshooting
Need help?
Why set up reporting hierarchies?
Reporting hierarchies tell Centralize who reports to whom on your team. Teams can be nested, so a manager's view includes their direct reports and everyone below them. When you set up reporting hierarchies, you can:
Filter Accounts, Opportunities, Home, and Product Metrics down to exactly what your team owns.
See your own accounts alongside every account owned by the reps who report to you, including reports of reports.
Skip manually selecting or excluding individual account owners to get a team-level view.
Give Centra context on your team so it can answer questions about your team's accounts and pipeline.
Reporting hierarchies never grant new access. Managers only see records they already have permission to view — if a rep owns an account the manager can't normally access, it stays hidden in the team view.
Before you start
You'll need Admin or Owner access in Centralize to assign reporting lines.
Each person can report to one manager. Any active, non-Partner workspace member can be a manager — anyone with at least one direct report automatically gets the team view.
Tip: If you're setting up a large team, it helps to prepare a list of each employee's email and their manager's email first. You can start from the reporting hierarchy import template (CSV) and import it in one step (see Import reporting lines from a CSV).
Assign a rep's manager
Go to Settings.
Under Administration, open Reporting hierarchy.
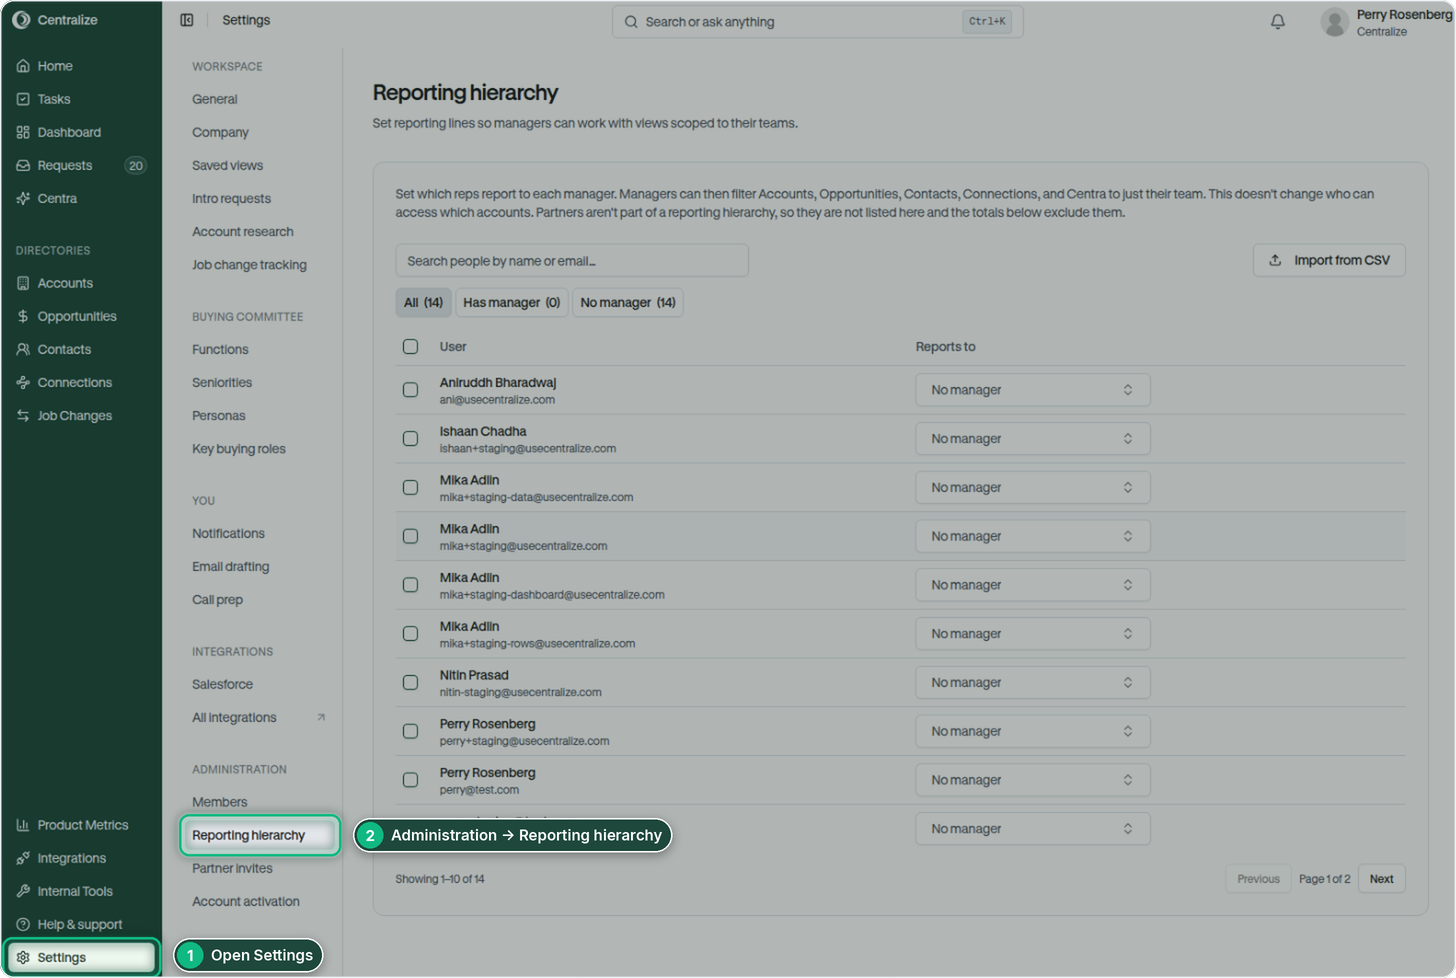
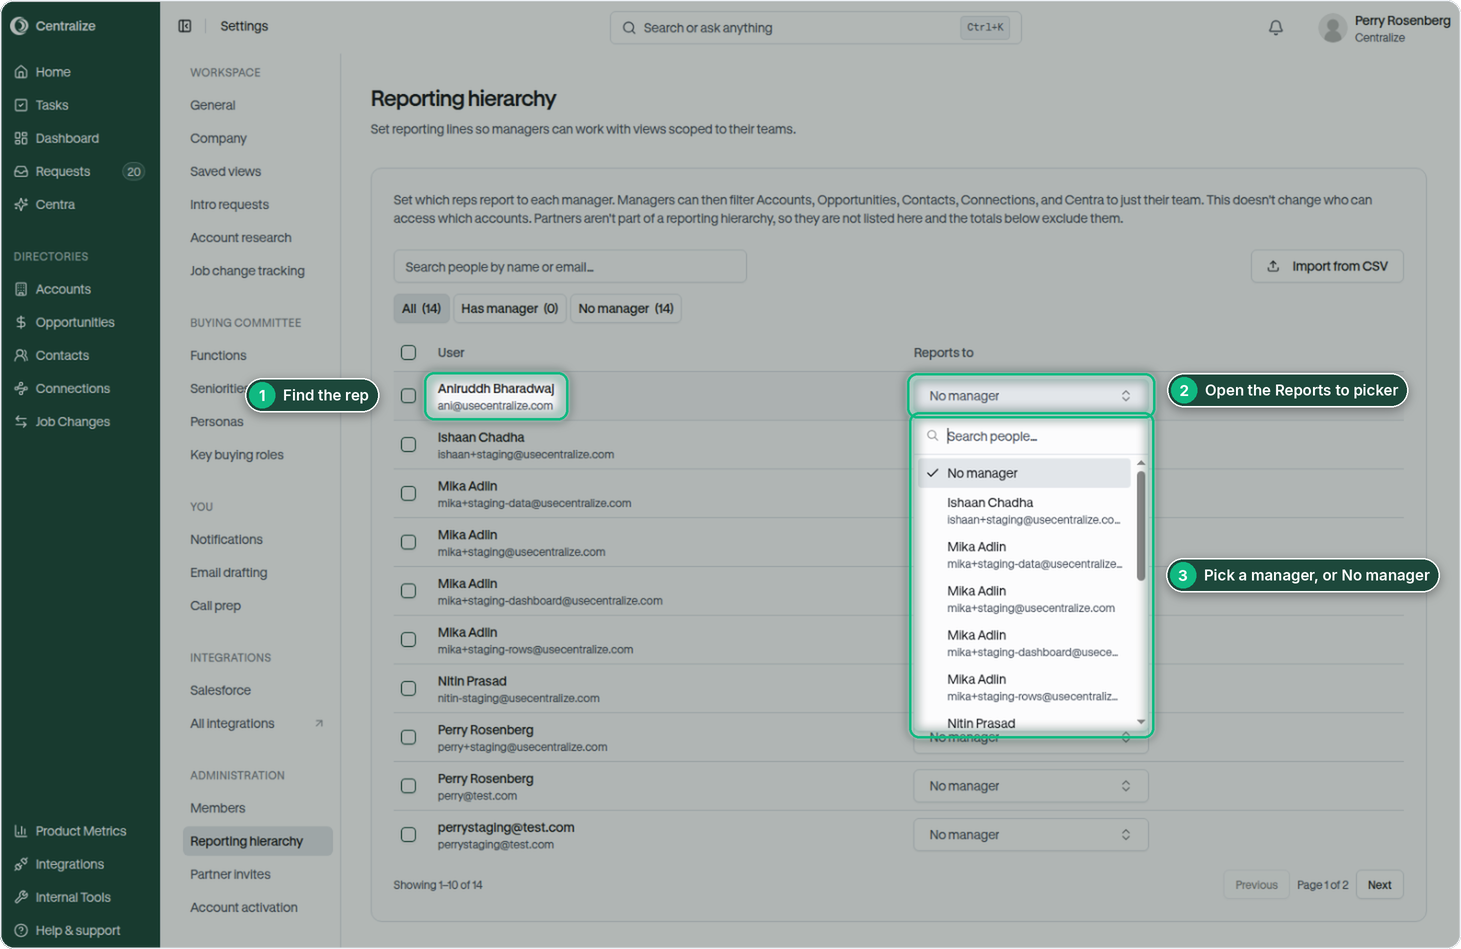
Find the rep you want to update. You can search by name or email.
Open the Reports to dropdown next to their name.
Select their manager, or select No manager to clear the relationship.
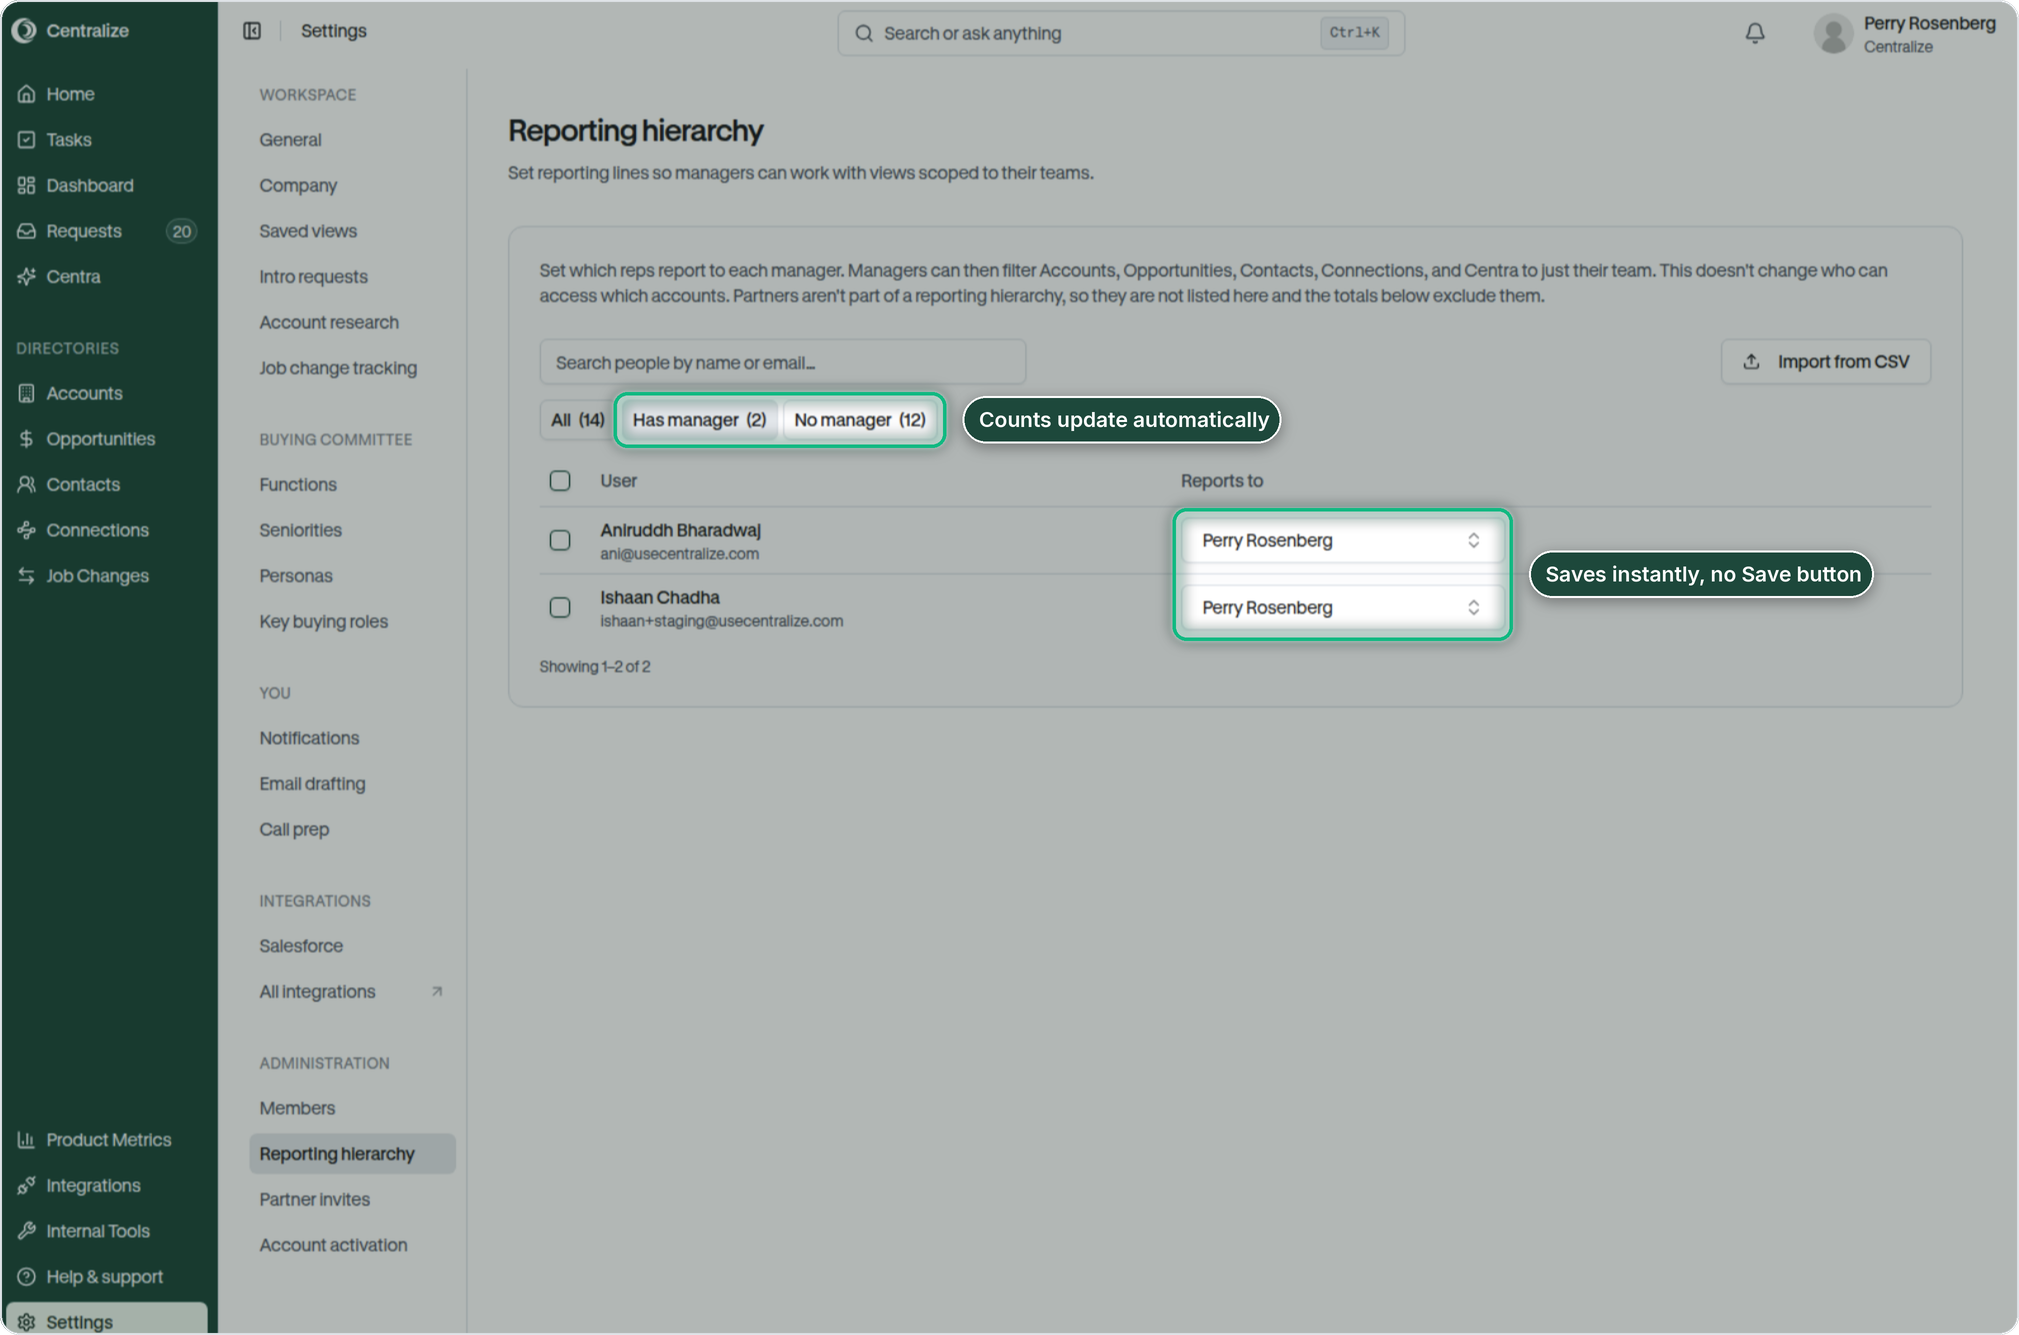
Your change saves as soon as you pick a manager — there's no separate Save button. Centralize prevents a person from reporting to themselves and blocks loops (for example, Alex → Priya → Alex).
Bulk assign a manager to multiple reps
Use bulk assignment when several reps report to the same manager.
Go to Settings → Administration → Reporting hierarchy.
Check the box next to each rep you want to update. A bar appears above the list showing how many people are selected.
In that bar, open the Reports to picker (Choose a manager…).
Select the manager for the selected reps, or select No manager to clear their managers.
Click Apply
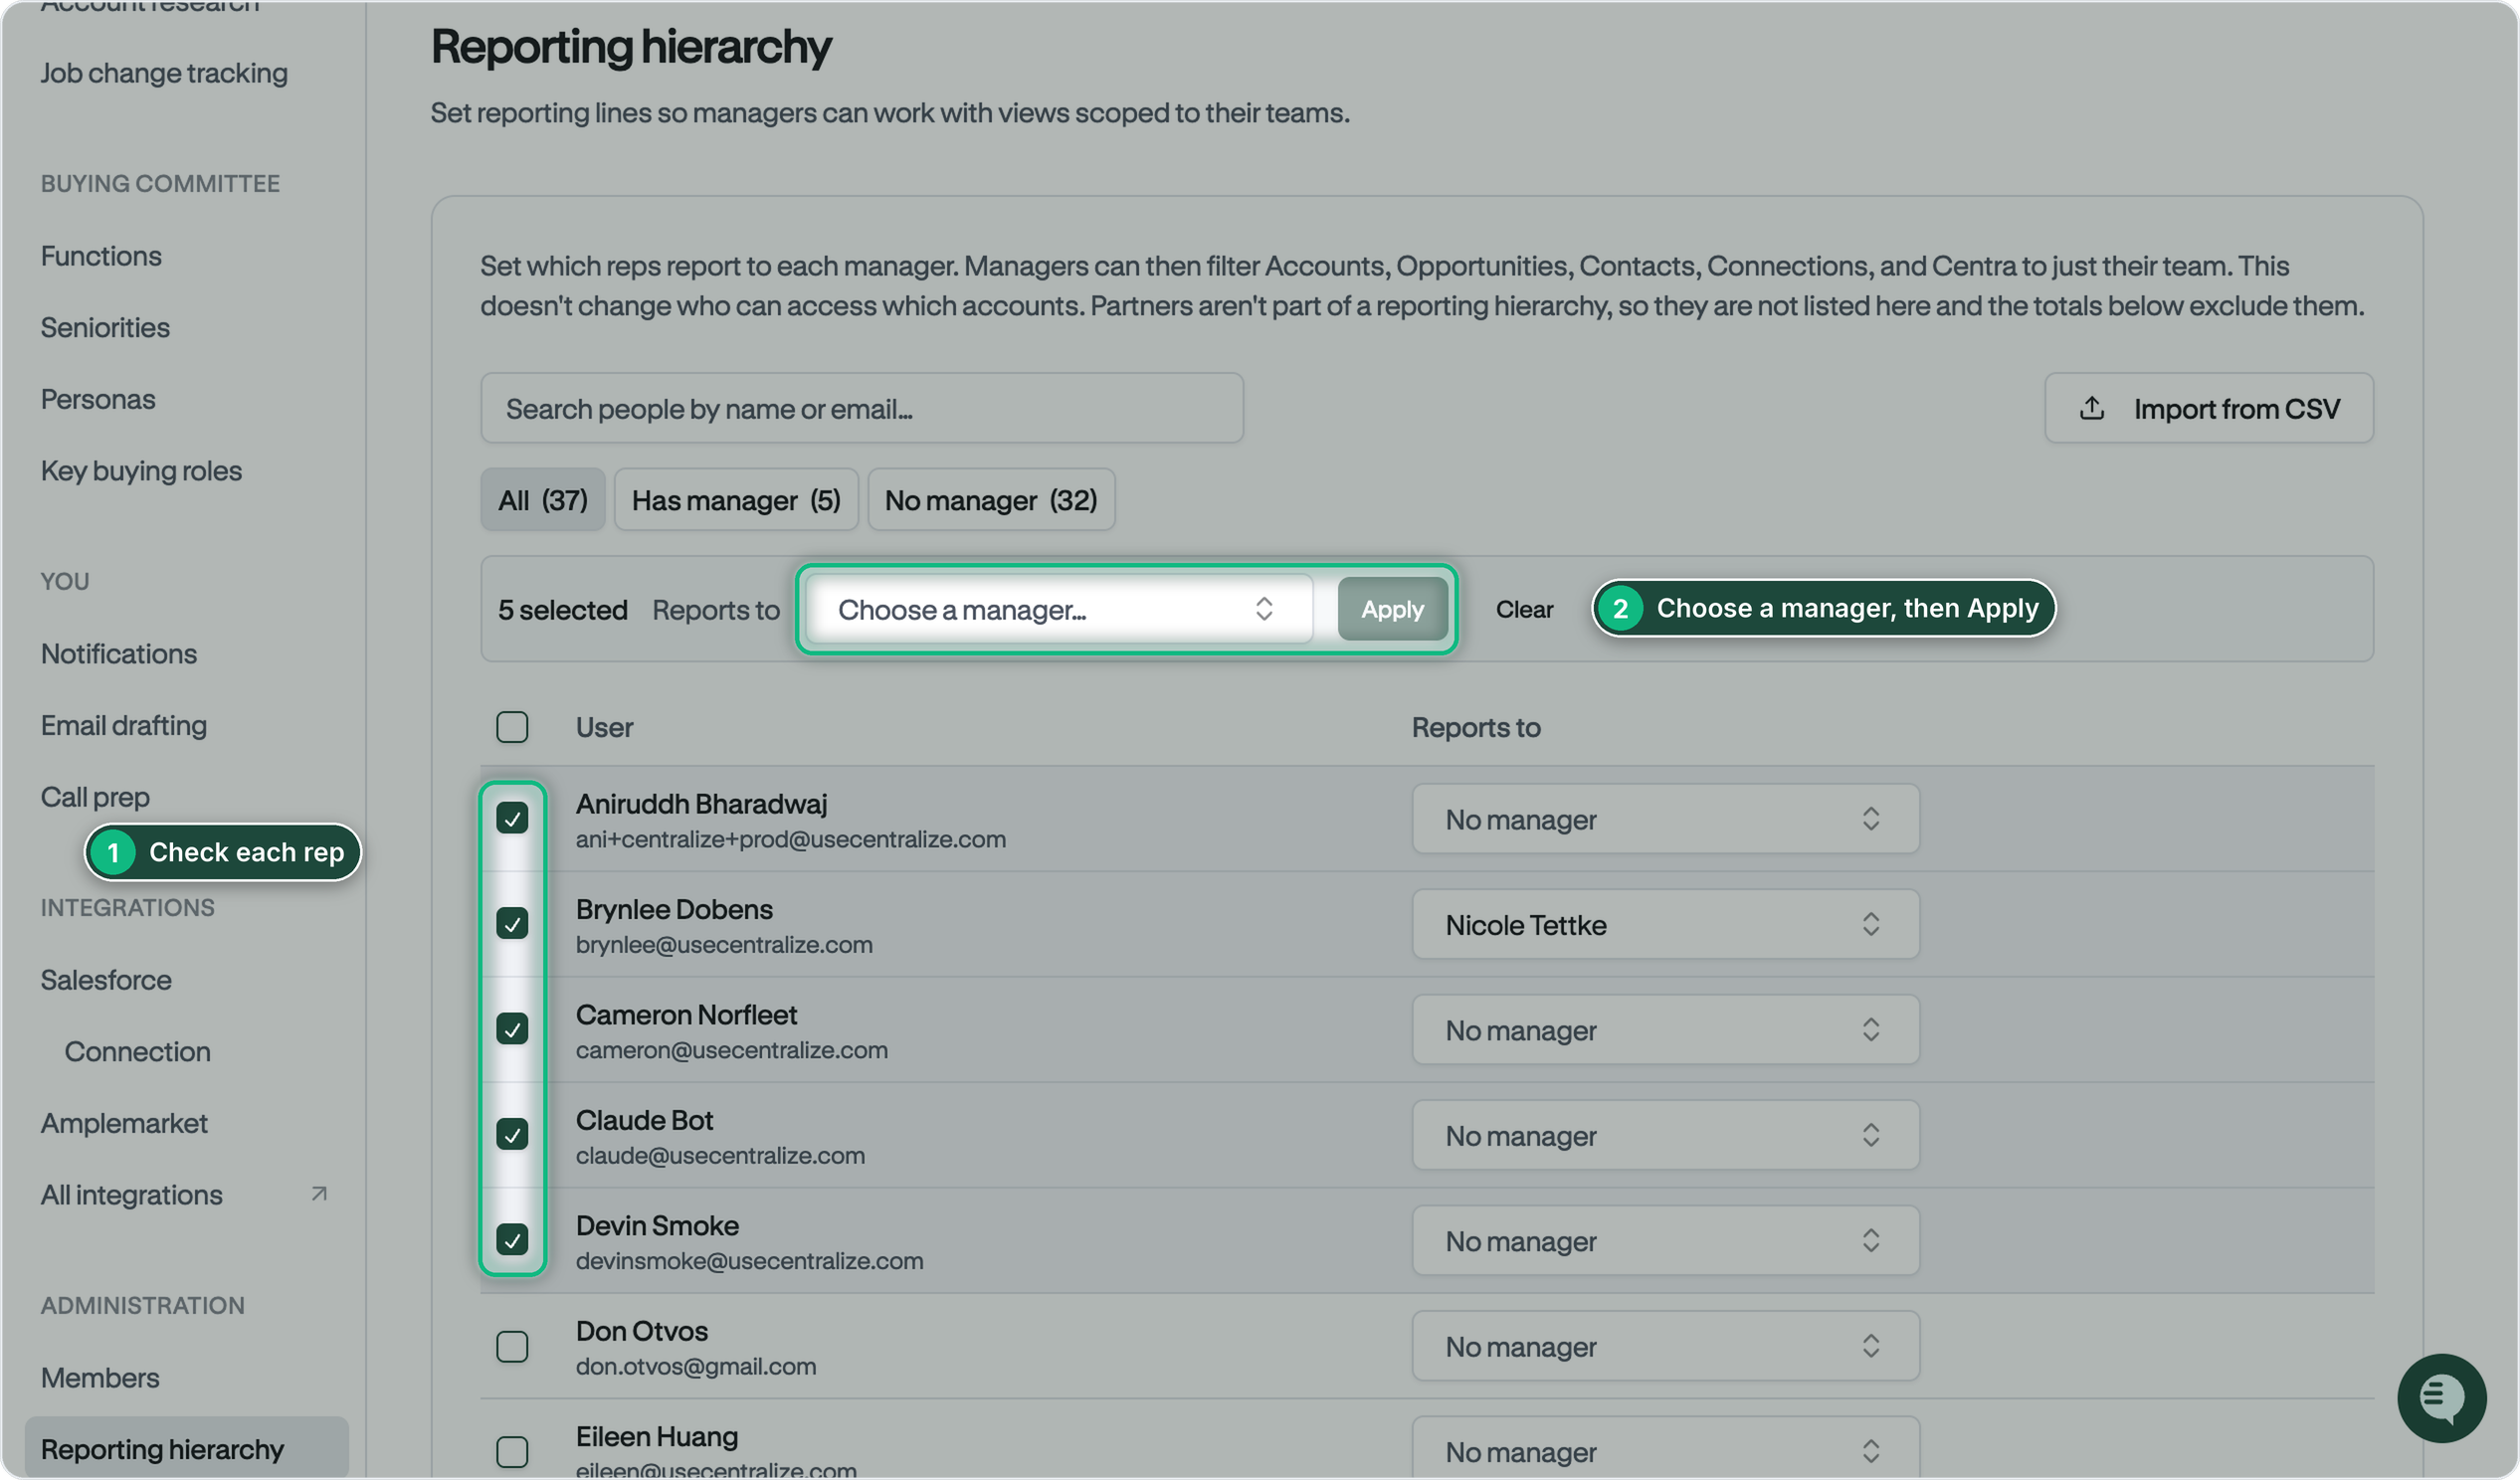
Your selections carry across pages and searches. You can search for reps, switch between the All, Has manager, and No manager tabs, or move between pages without losing the people you've already checked. If some selected people are hidden by your current search or tab, the bar shows how many aren't shown. They're still included when you click Apply. Check the box in the header row to select everyone matching the current filter, or click Clear to start over. A single bulk update supports up to 1,000 people.
Import reporting lines from a CSV
Use a CSV import when your team structure already lives in another system, like your HRIS or a spreadsheet.
Go to Settings → Administration → Reporting hierarchy.
Click Import from CSV.
Click Download CSV template, or download the reporting hierarchy import template (CSV) here.
Add one row per person, with their email in Employee Email and their manager's email in Manager Email.
Save the file as a .csv.
Back in the import window, click Click to choose a .csv file and select your file.
Confirm the Employee email column and Manager email column. Centralize picks these automatically when your headers look like the template, but you can change them.
Review the preview of changes. It shows how many managers will be set, removed, or are already correct, and how many rows will be skipped and why.
Click Apply to apply the valid rows.
Template format
Employee Email | Manager Email |
|---|---|
rep.one@yourcompany.com | manager.one@yourcompany.com |
rep.two@yourcompany.com | manager.one@yourcompany.com |
manager.one@yourcompany.com | director@yourcompany.com |
rep.three@yourcompany.com | none |
How Centralize reads your file:
Emails must match the email each person uses in Centralize.
A blank Manager Email leaves that person's current manager unchanged.
Enter none in Manager Email to remove a manager.
Files can contain up to 2,000 rows and be up to 10 MB.
Fix skipped rows. Invalid rows (for example, an email that doesn't match a workspace member) are skipped during import. Download the skipped rows from the preview, correct them, and upload them again.
View your team's data
Go to Home, Accounts, Opportunities, or Product Metrics.
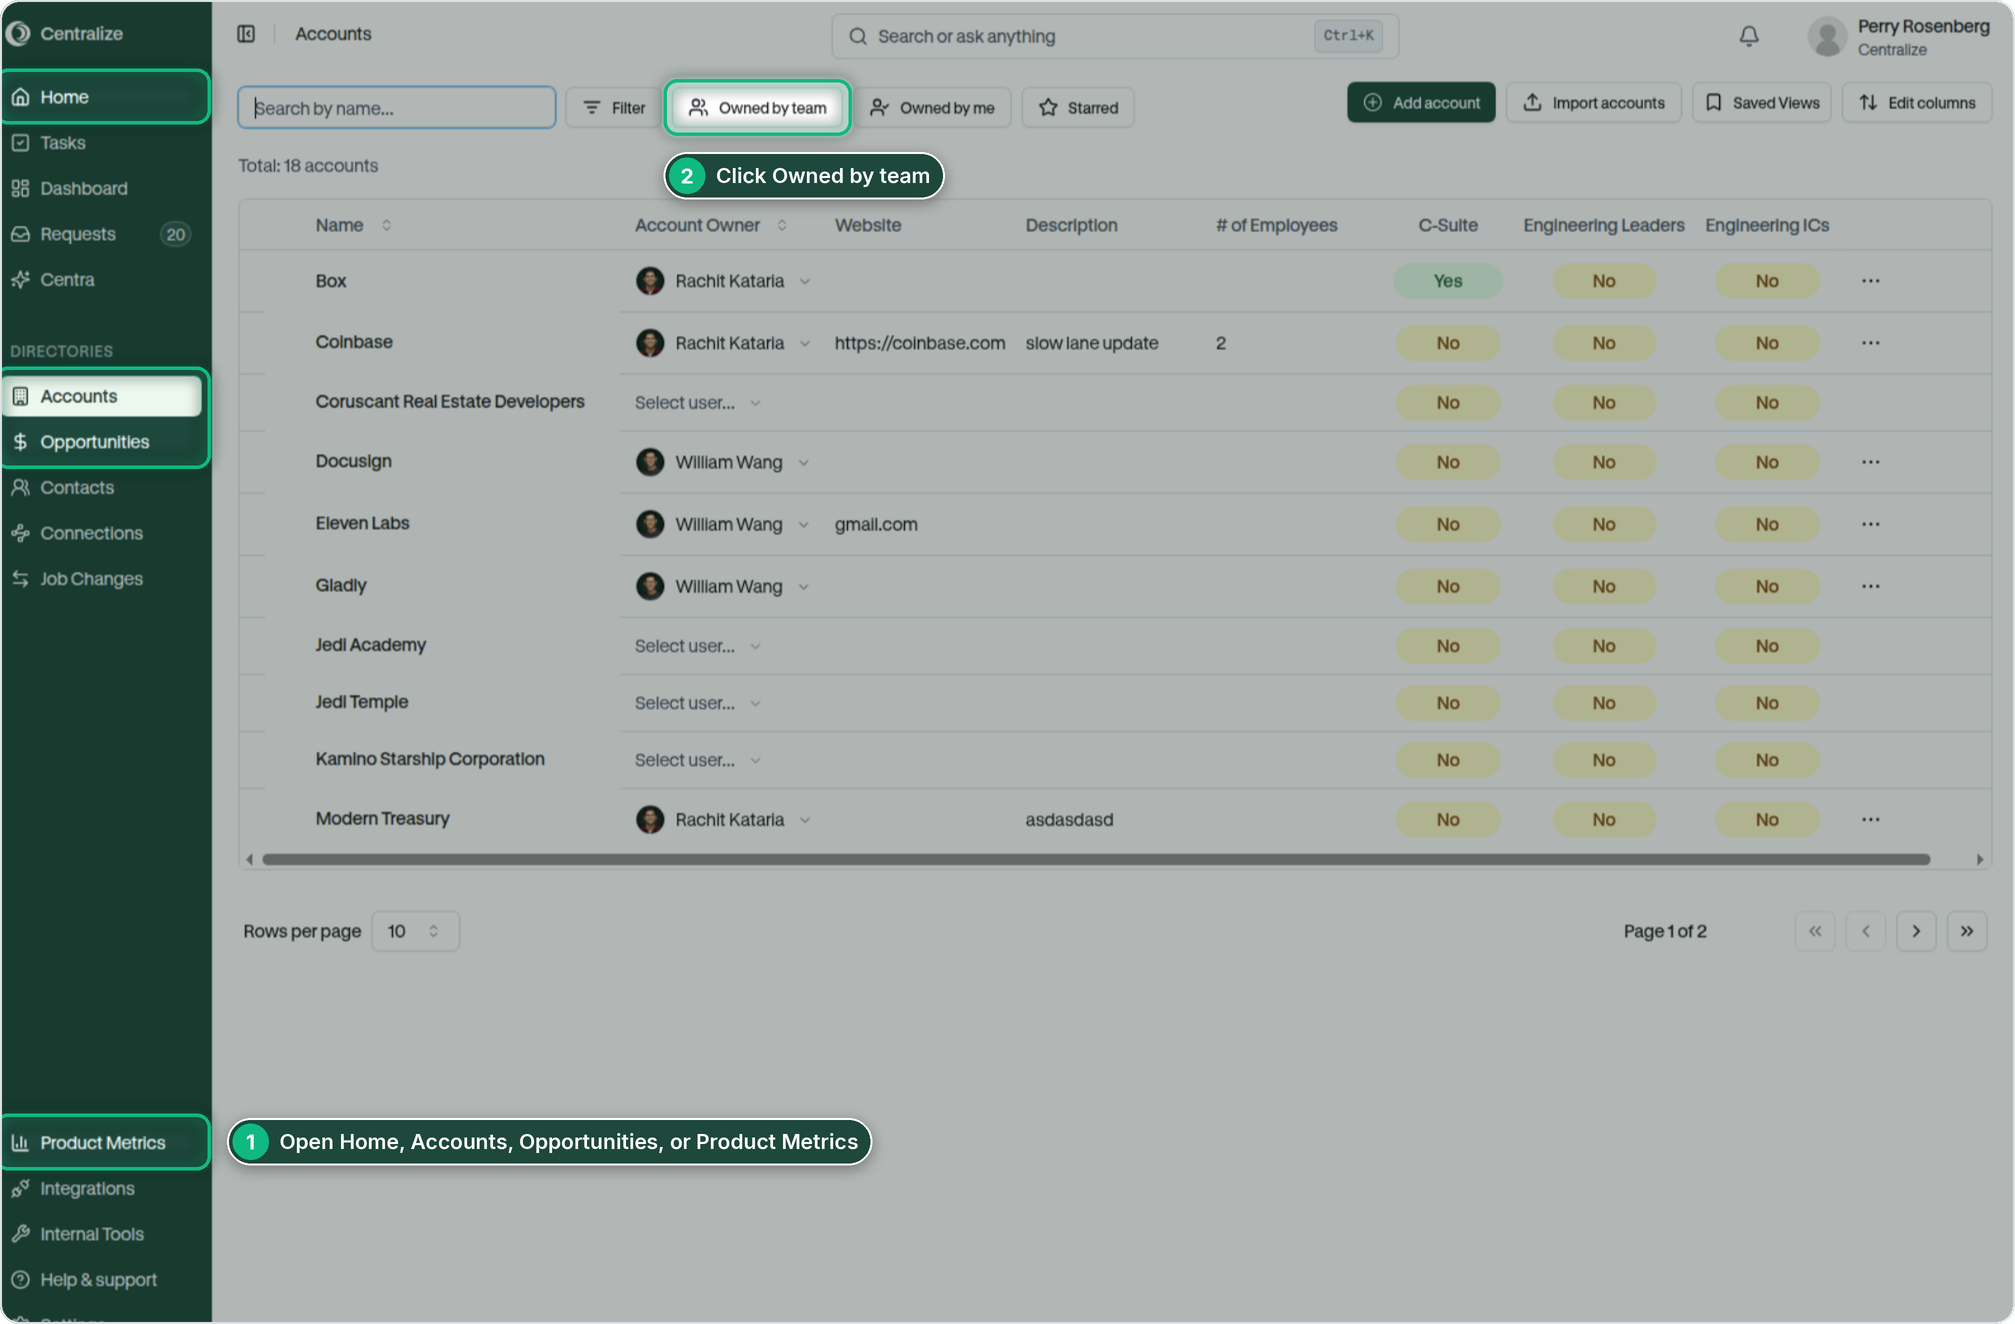
Click Owned by team in the toolbar.
Review what's shown — Centralize includes everything owned by you and every rep below you in the hierarchy.
Your Owned by team choice is remembered across pages and browser sessions, and Reset Filters won't turn it off. Click Owned by team again to return to your personal view. In Tasks and Manager View, the same option appears as My team.
Troubleshooting
Owned by team or My team is missing: confirm the manager has at least one direct report who has joined Centralize. Pending invitees don't count until they join.
An account is missing from the team view: check that a team member is the account owner or success manager on the account (or the sales manager, for workspaces not synced to a CRM), and that the manager has normal access to it.
The wrong reps are showing up in your team view: contact support@usecentralize.com and we'll help you sort it out.
A recent change isn't showing: refresh the page and allow a few minutes.
Offboarding a manager: reassign or clear their reports before you remove them from the workspace.
Need help?
If you can't find Reporting hierarchy in Settings, your CSV import skips rows you expect to load, or the Owned by team filter doesn't show your team's accounts, contact support@usecentralize.com for assistance. Your CSM can also upload your manager-to-rep list on your behalf.