Upload Accounts via CSV
Last updated: October 26, 2026
This guide walks you through adding accounts to Centralize in bulk using a CSV file. Centralize checks each row against your existing accounts and suggests what to do with it before anything is imported.
Contents
Before you start
Upload accounts via CSV
After the upload
Limits
Need help?
Before you start
Only Admins and Owners can import accounts. For everyone else, the Import accounts button is greyed out with the message "Only admins can import accounts."
Prepare your data in a spreadsheet before uploading. Centralize provides a downloadable CSV template with the correct column headers.
Duplicates are handled automatically: rows that repeat the same Salesforce ID or domain in your file are skipped, and accounts that already exist are matched rather than created again.
Upload accounts via CSV
Navigate to the Accounts section in the left sidebar.
Click Import accounts in the toolbar to open the Import accounts from CSV window.
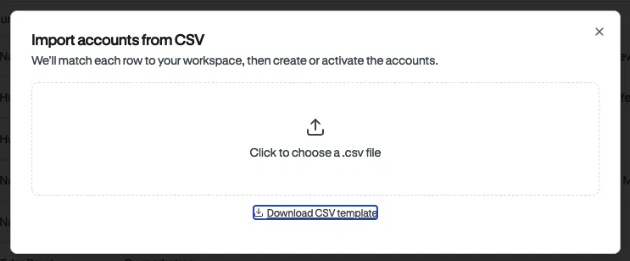
Click Download CSV template to get the template with the correct column headers, then open it in Excel or Google Sheets to fill in your data.
Fill in the template with your account data. Each row needs one of the following:
A Company Name plus a Domain, or
A valid SFDC ID, if Salesforce is connected.
Account Owner is optional but recommended. If your workspace doesn't have a CRM connected, each row also needs an owner email.
📎 Attachment:
Back in the Import accounts from CSV window, click Click to choose a .csv file and select your completed file.
Centralize matches each row to your workspace and suggests an action for it: already active, activate an existing account, create a new account, or skip.
Review the suggested actions, then confirm to complete the import.
After the upload
Once the upload is complete:
New accounts are created, and existing accounts you chose to activate are activated, in the Accounts tab. You don't need to activate accounts before importing them.
Centralize will automatically map email domains to the correct accounts.
Note: Large uploads may take a few minutes to fully process. Refresh the Accounts page if records don't appear immediately.
Limits
Up to 100 accounts per day per workspace, and up to 1,000 rows per file.
In self-serve (Standard) workspaces, the import window also shows how many accounts your plan has room for.
If you need a higher daily import limit, contact support.
Need help?
If you're having trouble uploading accounts via CSV, email support@usecentralize.com for assistance.